 server与agent协作详解[二]
# 3. 实操与代码解析 🔧
# 3.1 代码详解
# 3.1.1 流程步骤梳理
Ambari Server 与 Agent 指令交互大致分为如下几个核心环节,每一环都在源码中有明确分工:
# 3.1.1.1 指令发布:AgentCommandsPublisher
指令发布主逻辑位于 AgentCommandsPublisher.java,关键方法为 sendAgentCommand:
public void sendAgentCommand(Multimap<Long, AgentCommand> agentCommands) throws AmbariRuntimeException {
    try {
        threadPools.getAgentPublisherCommandsPool().submit(() -> {
            executionCommandsClusters.entrySet().stream().parallel().forEach(entry -> {
                STOMPUpdatePublisher.publish(new ExecutionCommandEvent(
                    entry.getKey(),
                    agentConfigsHolder.initializeDataIfNeeded(entry.getKey(), true).getTimestamp(),
                    entry.getValue()
                ));
            });
        }).get();
    } catch (InterruptedException|ExecutionException e) {
        LOG.error("Exception on sendAgentCommand", e);
    }
}
1
2
3
4
5
6
7
8
9
10
11
12
13
14
15
2
3
4
5
6
7
8
9
10
11
12
13
14
15
# 3.1.1.2 指令分发:STOMPUpdatePublisher

在 STOMPUpdatePublisher 内,publish 方法负责事件类型判断与投递:
public void publish(STOMPEvent event) {
    if (DefaultMessageEmitter.DEFAULT_AGENT_EVENT_TYPES.contains(event.getType())) {
      publishAgent(event);
    } else if (DefaultMessageEmitter.DEFAULT_API_EVENT_TYPES.contains(event.getType())) {
      publishAPI(event);
    } else {
      throw new AmbariRuntimeException("Event with type {" + event.getType() + "} can not be published.");
    }
  }

private void publishAgent(STOMPEvent event) {
    agentEventBus.post(event);
}
1
2
3
4
5
6
7
8
9
10
11
12
13
2
3
4
5
6
7
8
9
10
11
12
13
- 使用
agentEventBus(Guava EventBus)线程安全分发事件,驱动后续链路。
# 3.1.1.3 消息映射与分发:DefaultMessageEmitter
DefaultMessageEmitter 负责对事件类型做进一步判断,将消息推送到目标路径,分“全体广播”与“定向推送”两类:

@Override
public void emitMessage(STOMPEvent event) throws AmbariException {
  if (StringUtils.isEmpty(getDestination(event))) {
    throw new MessageDestinationIsNotDefinedException(event.getType());
  }
  if (event instanceof STOMPHostEvent) {
    STOMPHostEvent hostUpdateEvent = (STOMPHostEvent) event;
    if (hostUpdateEvent.getType().equals(STOMPEvent.Type.COMMAND)) {
      emitMessageRetriable((ExecutionCommandEvent) hostUpdateEvent);
    } else {
      emitMessageToHost(hostUpdateEvent);
    }
  } else {
    emitMessageToAll(event);
  }
}
1
2
3
4
5
6
7
8
9
10
11
12
13
14
15
16
2
3
4
5
6
7
8
9
10
11
12
13
14
15
16

DEFAULT_DESTINATIONS存储事件类型和路径映射,如:put(STOMPEvent.Type.COMMAND, "/commands");1
# 3.1.1.4 emitMessageToHost 解析

emitMessageToHost 专门负责发消息到目标主机:
protected void emitMessageToHost(STOMPHostEvent event) throws HostNotRegisteredException {
  Long hostId = event.getHostId();
  String sessionId = agentSessionManager.getSessionId(hostId);
  LOG.debug("Received status update event {} for host {} registered with session ID {}", event, hostId, sessionId);
  MessageHeaders headers = createHeaders(sessionId);
  simpMessagingTemplate.convertAndSendToUser(sessionId, getDestination(event), event, headers);
}
1
2
3
4
5
6
7
2
3
4
5
6
7
- 先查找 Agent 的
sessionId,再通过simpMessagingTemplate定向发送。
# 3.1.1.5 convertAndSendToUser 解析
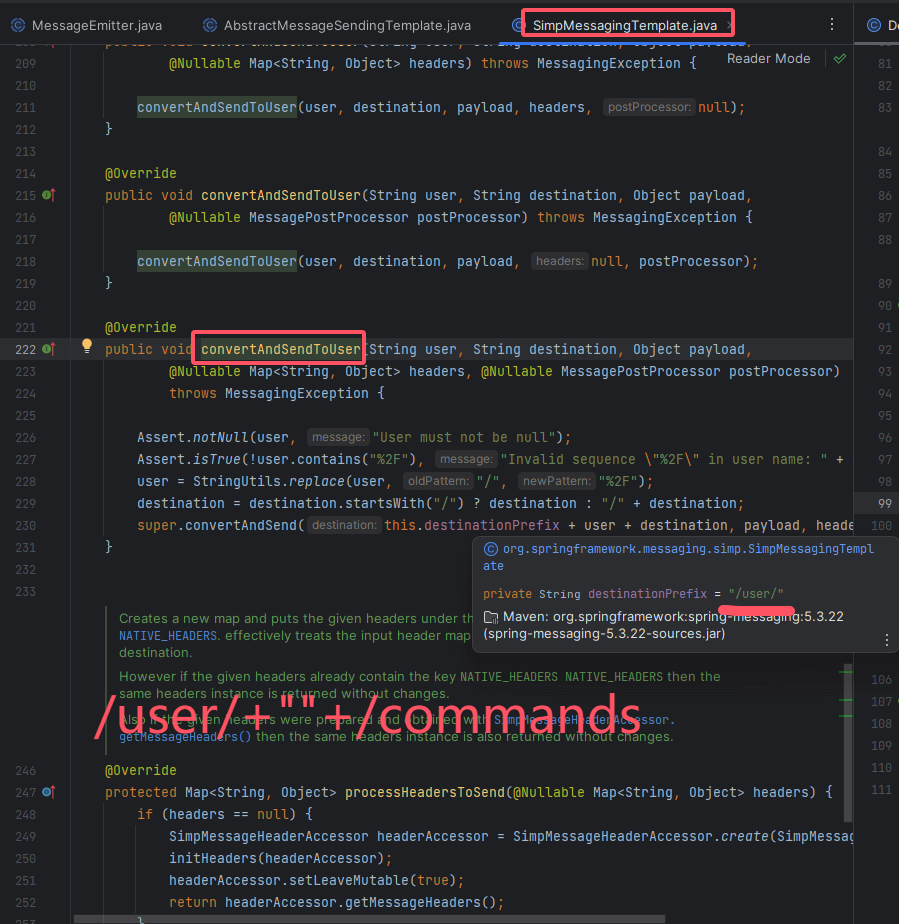
convertAndSendToUser 负责按 /user/{session}/commands 路径推送消息:
@Override
public void convertAndSendToUser(String user, String destination, Object payload,
        @Nullable Map<String, Object> headers, @Nullable MessagePostProcessor postProcessor)
        throws MessagingException {
    // ...参数校验
    super.convertAndSend(this.destinationPrefix + user + destination, payload, headers, postProcessor);
}
1
2
3
4
5
6
7
2
3
4
5
6
7

- 自动加
/user/前缀和 sessionId 路径,保证安全与隔离。
# 3.1.1.6 Agent 端事件订阅
Agent 端监听 Server 指令,Python 代码结构如下:

- 监听
/user/commands路径。相关变量定义:
COMMANDS_TOPIC = '/user/commands'
# ... 省略其它 topic 常量
1
2
2

def on_message(self, headers, message):
  if not 'destination' in headers:
    logger.warn("Received event from server which does not contain 'destination' header")
    return

  destination = headers['destination']
  if destination.rstrip('/') == self.get_handled_path().rstrip('/'):
    # 进入处理
1
2
3
4
5
6
7
8
2
3
4
5
6
7
8
- 通过 on_message 针对 destination 路径判断是否处理。

class CommandsEventListener(EventListener):
  def on_event(self, headers, message):
    commands = []
    cancel_commands = []
    for cluster_id in message['clusters'].keys():
      cluster_dict = message['clusters'][cluster_id]
      if 'commands' in cluster_dict:
        commands += cluster_dict['commands']
      if 'cancelCommands' in cluster_dict:
        cancel_commands += cluster_dict['cancelCommands']
    for command in commands:
      command['requiredConfigTimestamp'] = message['requiredConfigTimestamp']
    with self.action_queue.lock:
      self.action_queue.cancel(cancel_commands)
      self.action_queue.put(commands)
1
2
3
4
5
6
7
8
9
10
11
12
13
14
15
2
3
4
5
6
7
8
9
10
11
12
13
14
15
- 事件会被推入 action_queue 队列,后续被消费。

# 3.1.2 流程穿透
下面用“图 + 分步文本”把上述全链路完整梳理:
1. 指令生成:
   AgentCommandsPublisher.sendAgentCommand
            ↓
2. 事件发布:
   STOMPUpdatePublisher.publish
            ↓
3. 监听触发:
   EventBus.post --> STOMPUpdateListener.onUpdateEvent
            ↓
4. 消息发送:
   DefaultMessageEmitter.emitMessage
            ↓
   若指定主机 --> emitMessageToHost --> SimpMessagingTemplate.convertAndSendToUser
            ↓
5. Agent端处理:
   STOMP Listener.on_message --> CommandsEventListener.on_event --> action_queue.put
1
2
3
4
5
6
7
8
9
10
11
12
13
14
15
16
2
3
4
5
6
7
8
9
10
11
12
13
14
15
16
# 3.1.2.2 文字分步说明
Server 端:
sendAgentCommand生成指令事件。- 由
STOMPUpdatePublisher投递至 EventBus,驱动监听链路。
事件监听器:
STOMPUpdateListener捕获并调用DefaultMessageEmitter进入路径生成和消息发送环节。
消息发送:
- 针对目标主机,通过
emitMessageToHost拼接 session 路径,交给SimpMessagingTemplate.convertAndSendToUser发送。
- 针对目标主机,通过
Agent 端:
- Python 端通过 on_message 监听消息,将指令通过
CommandsEventListener.on_event推入 action_queue,等待本地消费。
- Python 端通过 on_message 监听消息,将指令通过
# 4. 总结与延伸学习 🚀
# 4.1 内容回顾
本章我们详细剖析了 STOMP 协议在 Ambari Server-Agent 指令分发链路中的源码与实现:
- 指令如何自上而下生成、路由、映射目标路径并安全分发;
- Agent 端如何监听、判别和推送到本地队列,最终触发命令消费;
- 全链路关键点用图片、注释与代码结合解读,便于查阅和实践。
# 4.2 后续学习建议
- 源码实战 建议结合源码断点和日志分析实际 Install、Start、Stop 等指令的分发执行;
- 定制开发 理解消息分发机制后,可安全扩展自定义指令或特定业务事件,实现更灵活的企业运维自动化;
- 深挖原理 推荐继续学习 ambari-stomp、Guava EventBus 等实现细节,提升分布式系统设计能力。
- 01
- bigtop-select 打包缺 compat 报错修复 deb07-16
- 02
- bigtop-select 打包缺 control 文件报错修复 deb07-16
- 03
- 首次编译-环境初始化 必装07-16