 [Step1]-FreeIPA Client 安装与入域实战Kylin V10
需要 ttr-release 版本 >= 2.2.3
Ambari 3.0.0 + Free IPA 统一认证体系 支持 Kylin / Ubuntu / Rocky 等系统 本文示例环境:Kylin V10 SP3 x86,Realm = TEST.COM
# 一、客户端入域前的环境准备
客户端入域并不是直接执行 ipa-client-install 就结束,而是需要确保系统依赖、DNS、时间同步等基础环境全部正常。
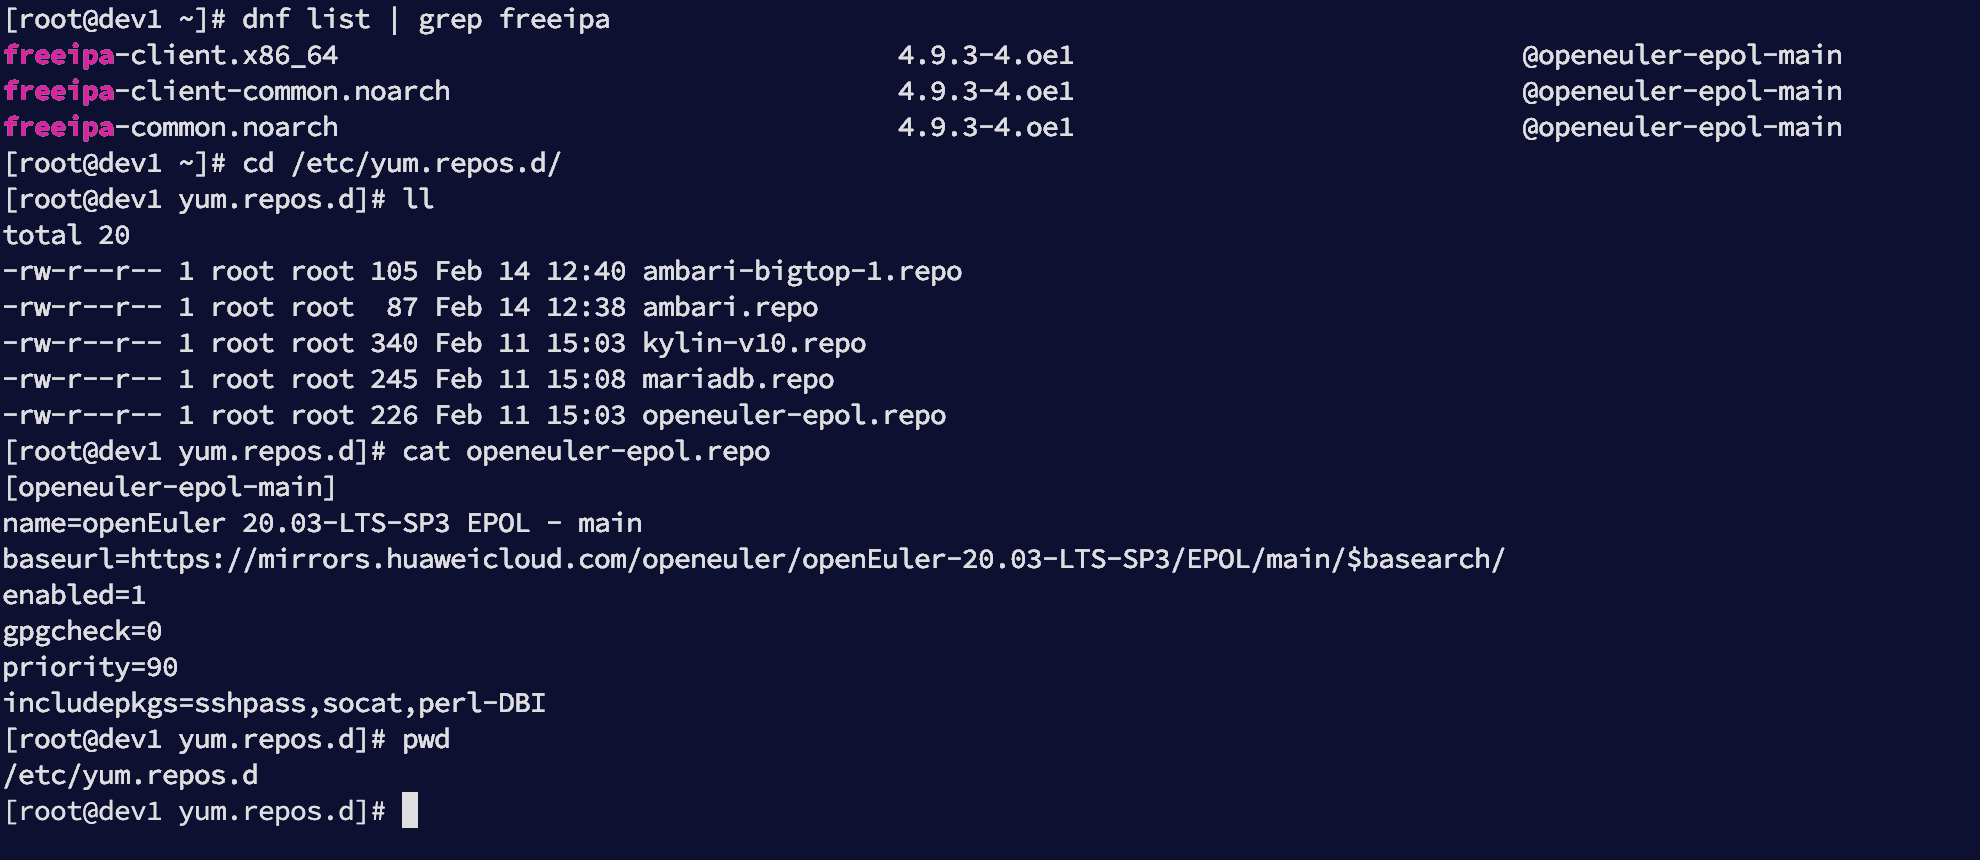
# 1.1 配置 EPOL 镜像源(Kylin 必需)
编辑文件:
vim /etc/yum.repos.d/openeuler-epol.repo
1
内容如下:
[openeuler-epol-main]
name=openEuler 20.03-LTS-SP3 EPOL - main
baseurl=https://mirrors.huaweicloud.com/openeuler/openEuler-20.03-LTS-SP3/EPOL/main/$basearch/
enabled=1
gpgcheck=0
priority=90
includepkgs=sshpass,socat,perl-DBI
1
2
3
4
5
6
7
2
3
4
5
6
7
确认路径:
[root@dev1 yum.repos.d]# pwd
/etc/yum.repos.d
1
2
2
效果如下:
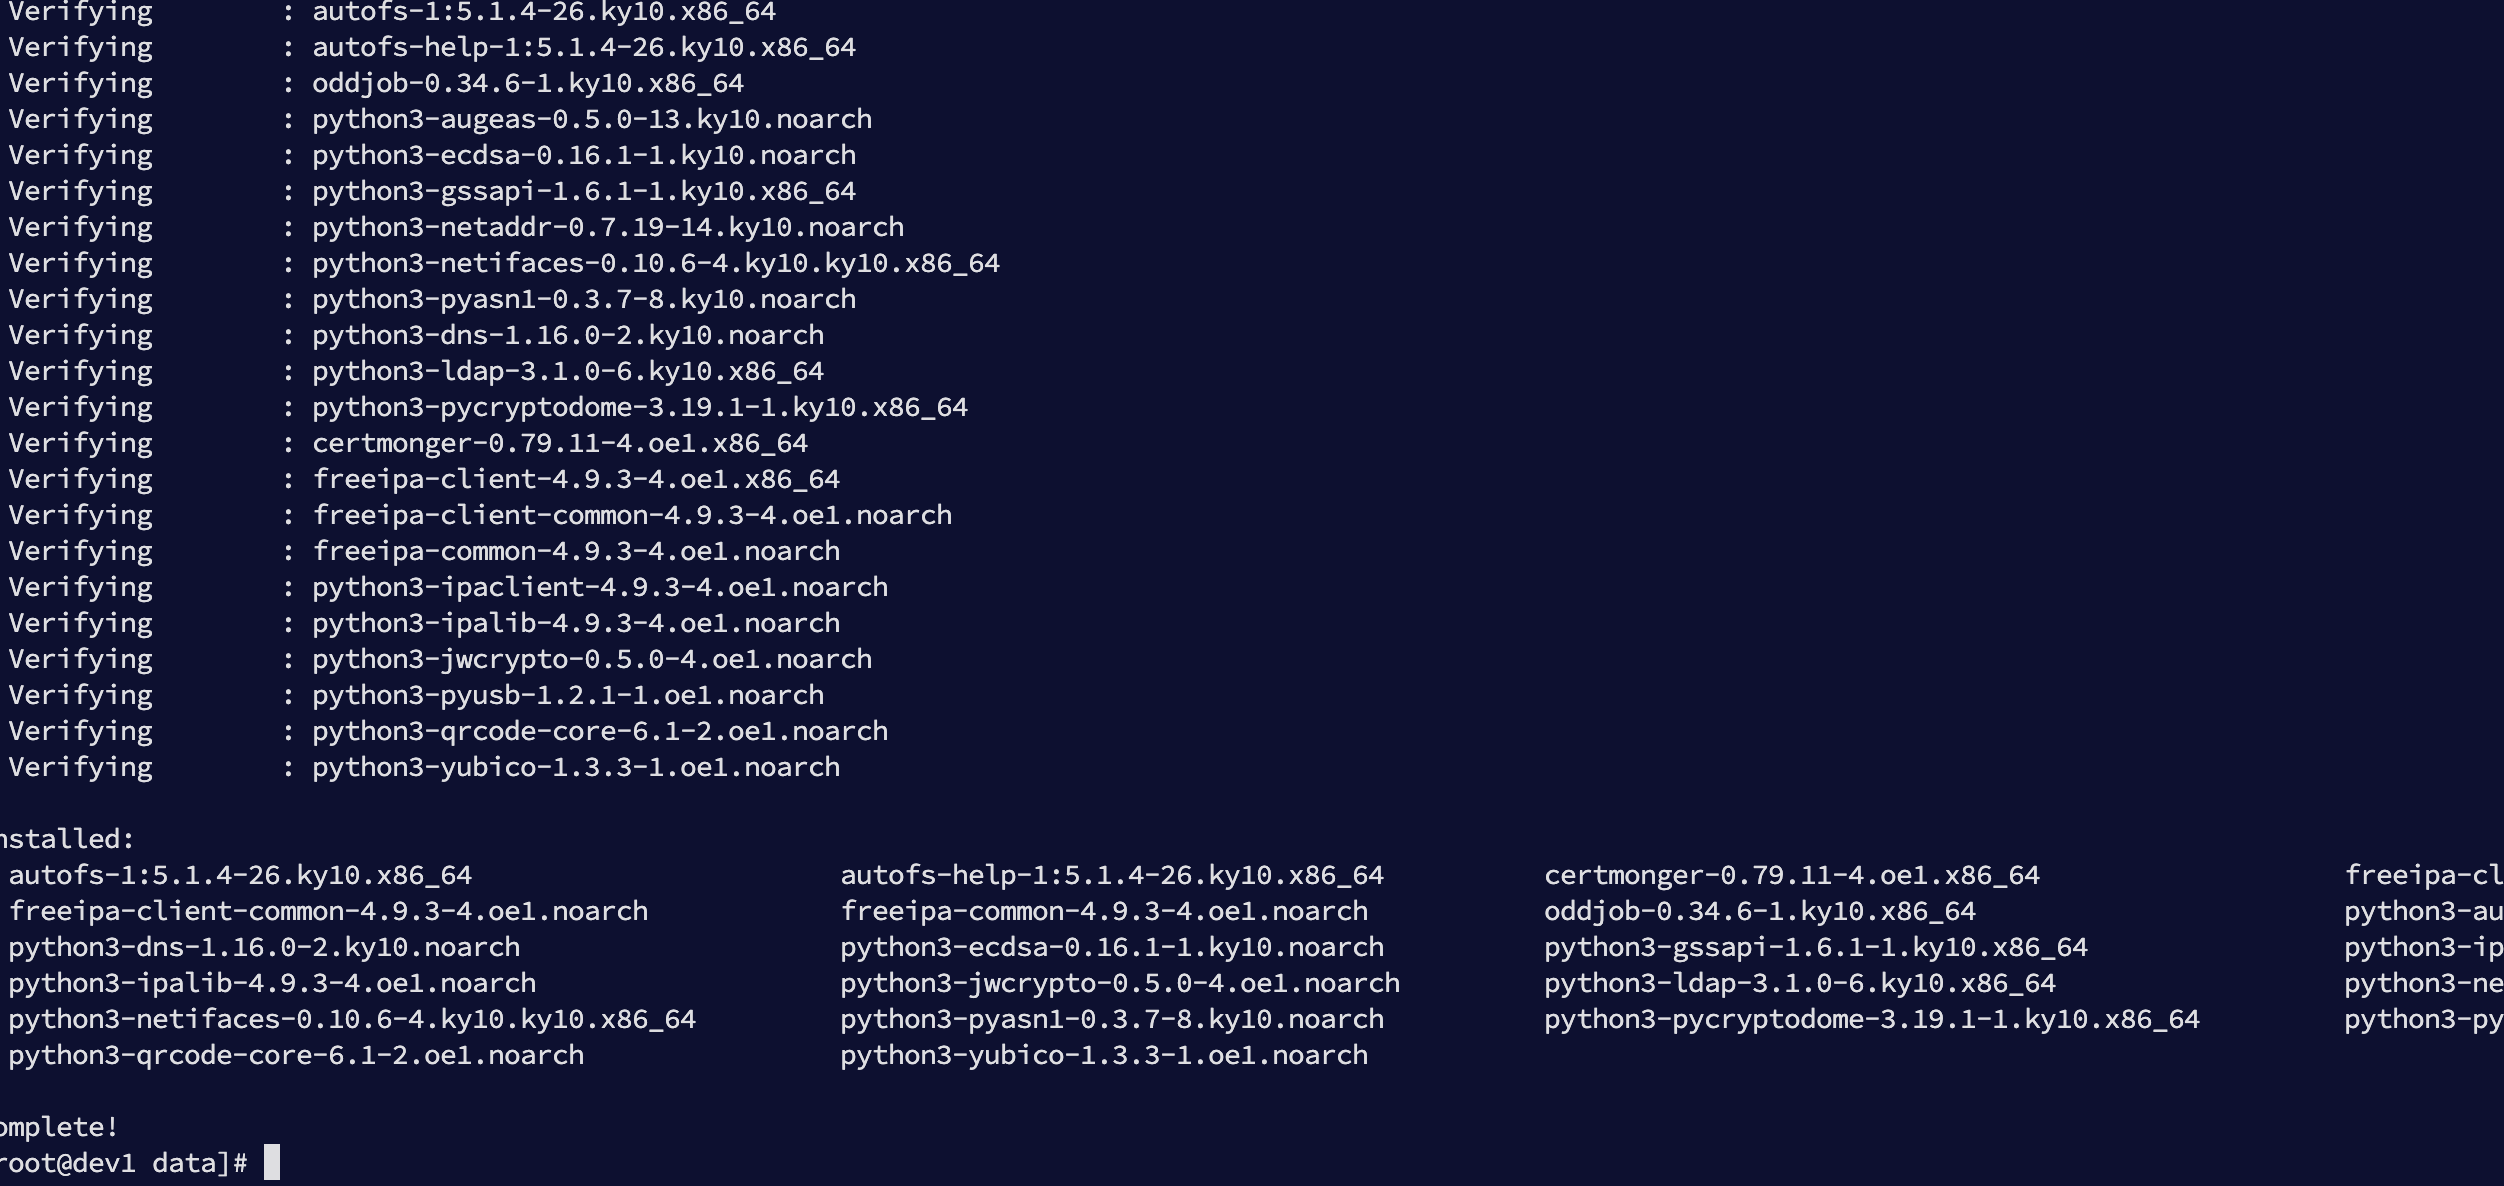
# 1.2 安装 FreeIPA Client 组件
安装入域所需依赖:
dnf install -y freeipa-client sssd sssd-tools oddjob oddjob-mkhomedir authselect sssd-kcm certmonger
1
各组件作用说明:
| 组件 | 作用 |
|---|---|
| freeipa-client | 入域核心程序 |
| sssd | 统一身份认证服务 |
| oddjob-mkhomedir | 自动创建用户家目录 |
| authselect | PAM / NSS 管理工具 |
| certmonger | 证书管理 |
# 1.3 配置 authselect 与 hosts 解析顺序
选择 sssd profile:
authselect select sssd with-mkhomedir --force
1
持久化 hosts 解析顺序:
touch /etc/authselect/user-nsswitch.conf

grep -qE '^\s*hosts:' /etc/authselect/user-nsswitch.conf \
  || echo 'hosts:      files dns myhostname' >> /etc/authselect/user-nsswitch.conf

authselect apply-changes
1
2
3
4
5
6
2
3
4
5
6
说明:
- 先查 /etc/hosts
- 再查 DNS
- 最后 myhostname 兜底
# 1.4 启动并启用相关服务
chmod 600 /etc/sssd/sssd.conf 2>/dev/null || true

systemctl enable --now sssd oddjobd
systemctl enable --now sssd-kcm
systemctl enable --now certmonger
1
2
3
4
5
2
3
4
5
执行效果:
# 二、导入 IPA CA 证书信任链
客户端必须信任 FreeIPA CA,否则 HTTPS 与 Kerberos 认证会出现问题。
mkdir -p /etc/pki/ca-trust/source/anchors

install -m 0644 /etc/ipa/ca.crt \
/etc/pki/ca-trust/source/anchors/ipa-TEST-CA.crt

update-ca-trust extract
1
2
3
4
5
6
2
3
4
5
6
# 三、客户端加入 Realm(TEST.COM)
# 3.1 交互式加入(推荐首次验证)
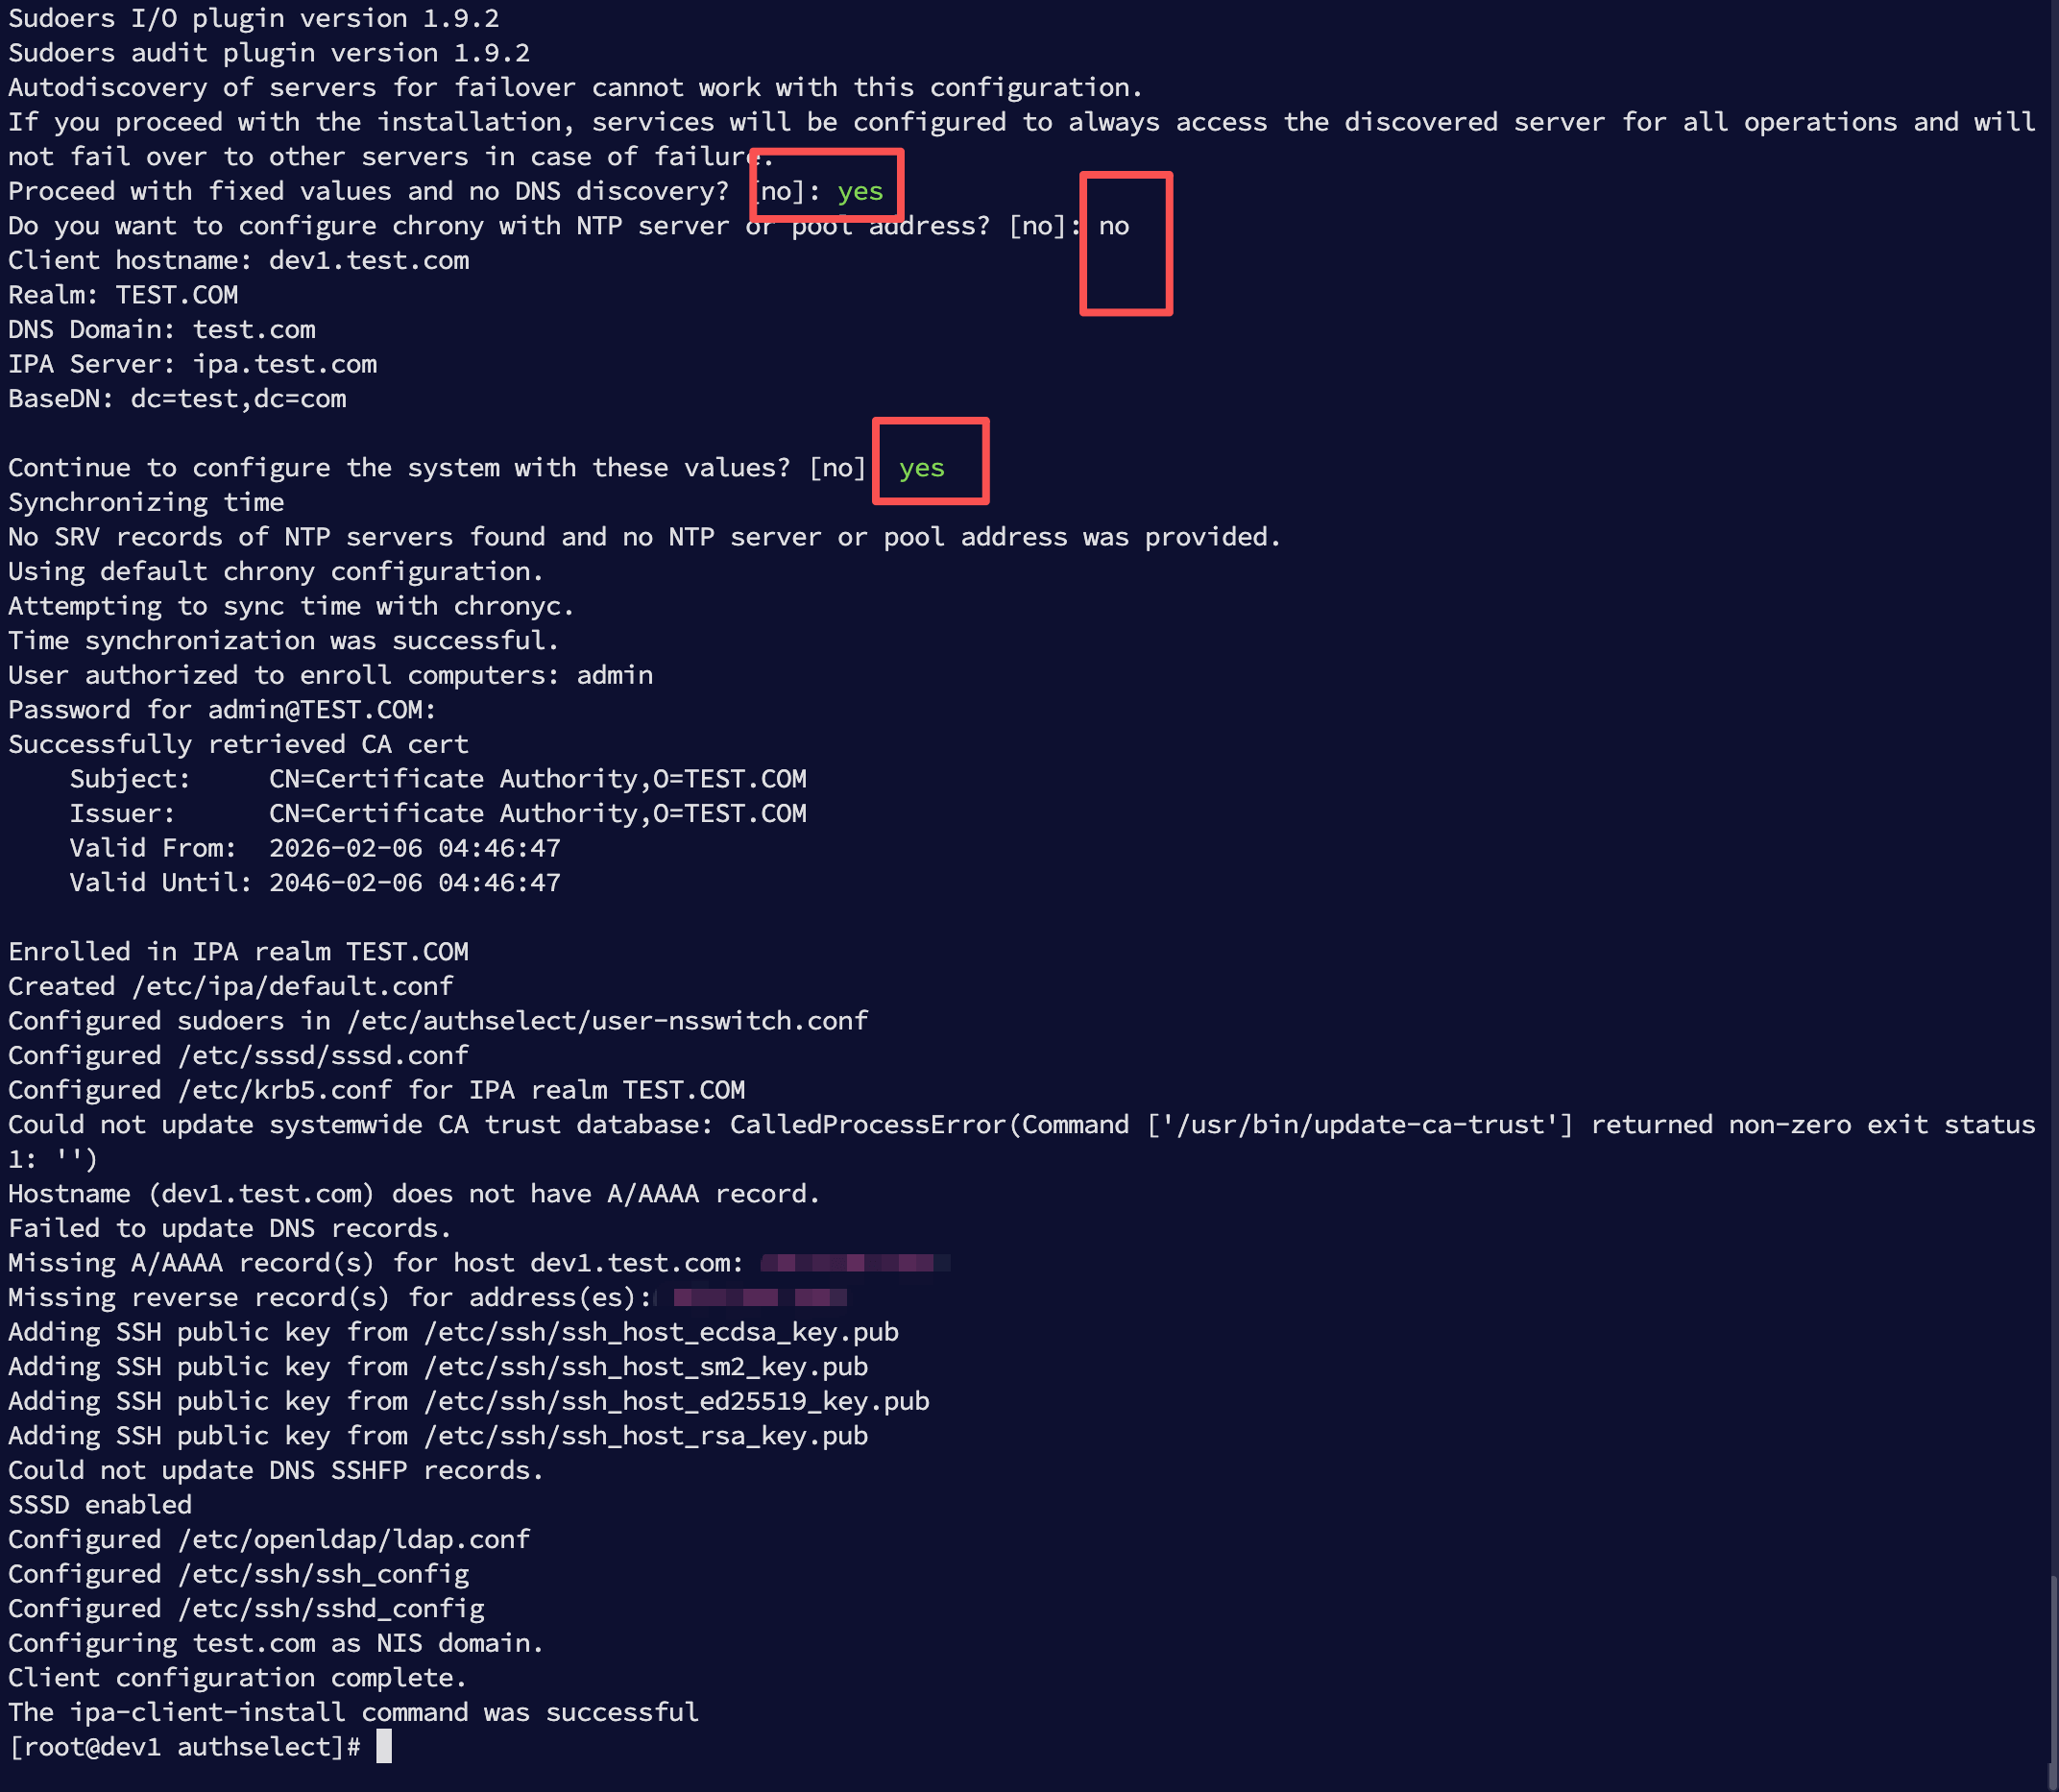
执行:
ipa-client-install --mkhomedir \
  --server=ipa.test.com \
  --domain=test.com \
  --realm=TEST.COM
1
2
3
4
2
3
4
交互步骤:
- Proceed with fixed values? → yes
- Configure chrony? → no
- Continue to configure? → yes
完整输出如下(节选):
Enrolled in IPA realm TEST.COM
Configured /etc/sssd/sssd.conf
Configured /etc/krb5.conf for IPA realm TEST.COM
Client configuration complete.
1
2
3
4
2
3
4
完整日志示例:
Sudoers I/O plugin version 1.9.2
Sudoers audit plugin version 1.9.2
Autodiscovery of servers for failover cannot work with this configuration.
If you proceed with the installation, services will be configured to always access the discovered server for all operations and will not fail over to other servers in case of failure.
Proceed with fixed values and no DNS discovery? [no]: yes
Do you want to configure chrony with NTP server or pool address? [no]: no
Client hostname: dev1.test.com
Realm: TEST.COM
DNS Domain: test.com
IPA Server: ipa.test.com
BaseDN: dc=test,dc=com

Continue to configure the system with these values? [no]: yes
Synchronizing time
No SRV records of NTP servers found and no NTP server or pool address was provided.
Using default chrony configuration.
Attempting to sync time with chronyc.
Time synchronization was successful.
User authorized to enroll computers: admin
Password for admin@TEST.COM:
Successfully retrieved CA cert
    Subject:     CN=Certificate Authority,O=TEST.COM
    Issuer:      CN=Certificate Authority,O=TEST.COM
    Valid From:  2026-02-06 04:46:47
    Valid Until: 2046-02-06 04:46:47

Enrolled in IPA realm TEST.COM
Created /etc/ipa/default.conf
Configured sudoers in /etc/authselect/user-nsswitch.conf
Configured /etc/sssd/sssd.conf
Configured /etc/krb5.conf for IPA realm TEST.COM
Could not update systemwide CA trust database: CalledProcessError(Command ['/usr/bin/update-ca-trust'] returned non-zero exit status 1: '')
Hostname (dev1.test.com) does not have A/AAAA record.
Failed to update DNS records.
Missing A/AAAA record(s) for host dev1.test.com: 192.168.3.235.
Missing reverse record(s) for address(es): 192.168.3.235.
Adding SSH public key from /etc/ssh/ssh_host_ecdsa_key.pub
Adding SSH public key from /etc/ssh/ssh_host_sm2_key.pub
Adding SSH public key from /etc/ssh/ssh_host_ed25519_key.pub
Adding SSH public key from /etc/ssh/ssh_host_rsa_key.pub
Could not update DNS SSHFP records.
SSSD enabled
Configured /etc/openldap/ldap.conf
Configured /etc/ssh/ssh_config
Configured /etc/ssh/sshd_config
Configuring test.com as NIS domain.
Client configuration complete.
The ipa-client-install command was successful
[root@dev1 authselect]#
1
2
3
4
5
6
7
8
9
10
11
12
13
14
15
16
17
18
19
20
21
22
23
24
25
26
27
28
29
30
31
32
33
34
35
36
37
38
39
40
41
42
43
44
45
46
47
48
49
2
3
4
5
6
7
8
9
10
11
12
13
14
15
16
17
18
19
20
21
22
23
24
25
26
27
28
29
30
31
32
33
34
35
36
37
38
39
40
41
42
43
44
45
46
47
48
49
界面如下:
# 3.2 非交互式加入(生产推荐)
ipa-client-install --mkhomedir \
  --server=ipa.test.com \
  --domain=test.com \
  --realm=TEST.COM \
  --hostname="$(hostname -f)" \
  --principal=admin \
  --password='Ttbigdata@2026' \
  --unattended \
  --force-join \
  --force-ntpd
1
2
3
4
5
6
7
8
9
10
2
3
4
5
6
7
8
9
10
关键要求:
| 项目 | 要求 |
|---|---|
| hostname | 必须是 FQDN |
| DNS | 必须存在 A 记录 |
| 时间 | 与 IPA 同步 |
# 四、DNS 报错排查与修复
如果出现错误:
Hostname (dev3.test.com) does not have A/AAAA record.
Failed to update DNS records.
1
2
2
说明 DNS 中缺少主机记录。
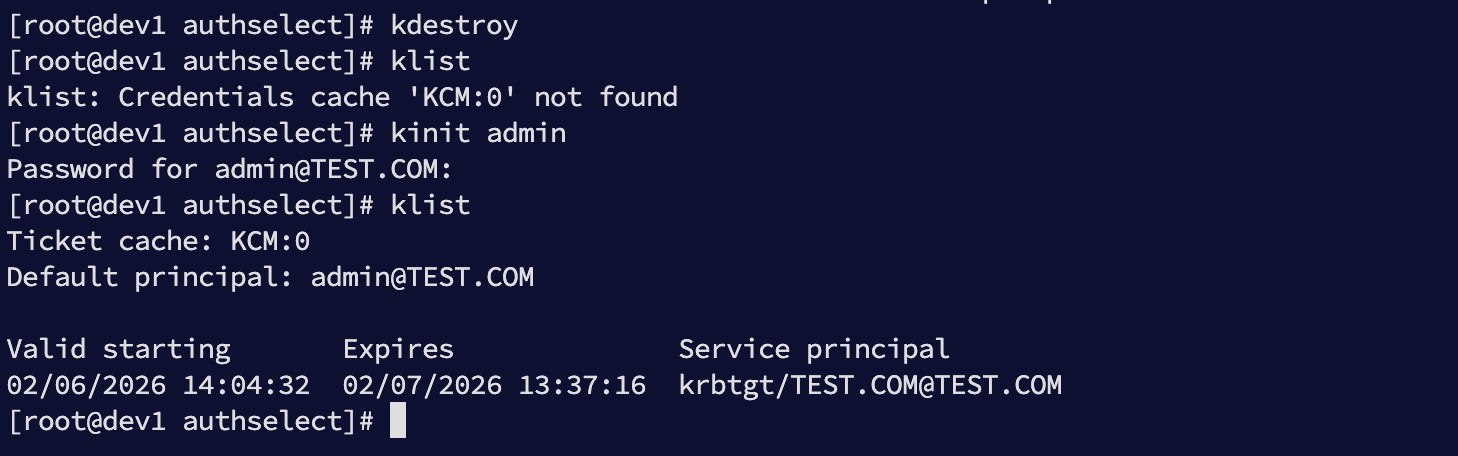
# 4.1 获取管理员票据
kinit admin
klist
1
2
2
密码:
Ttbigdata@2026
1
效果如下:
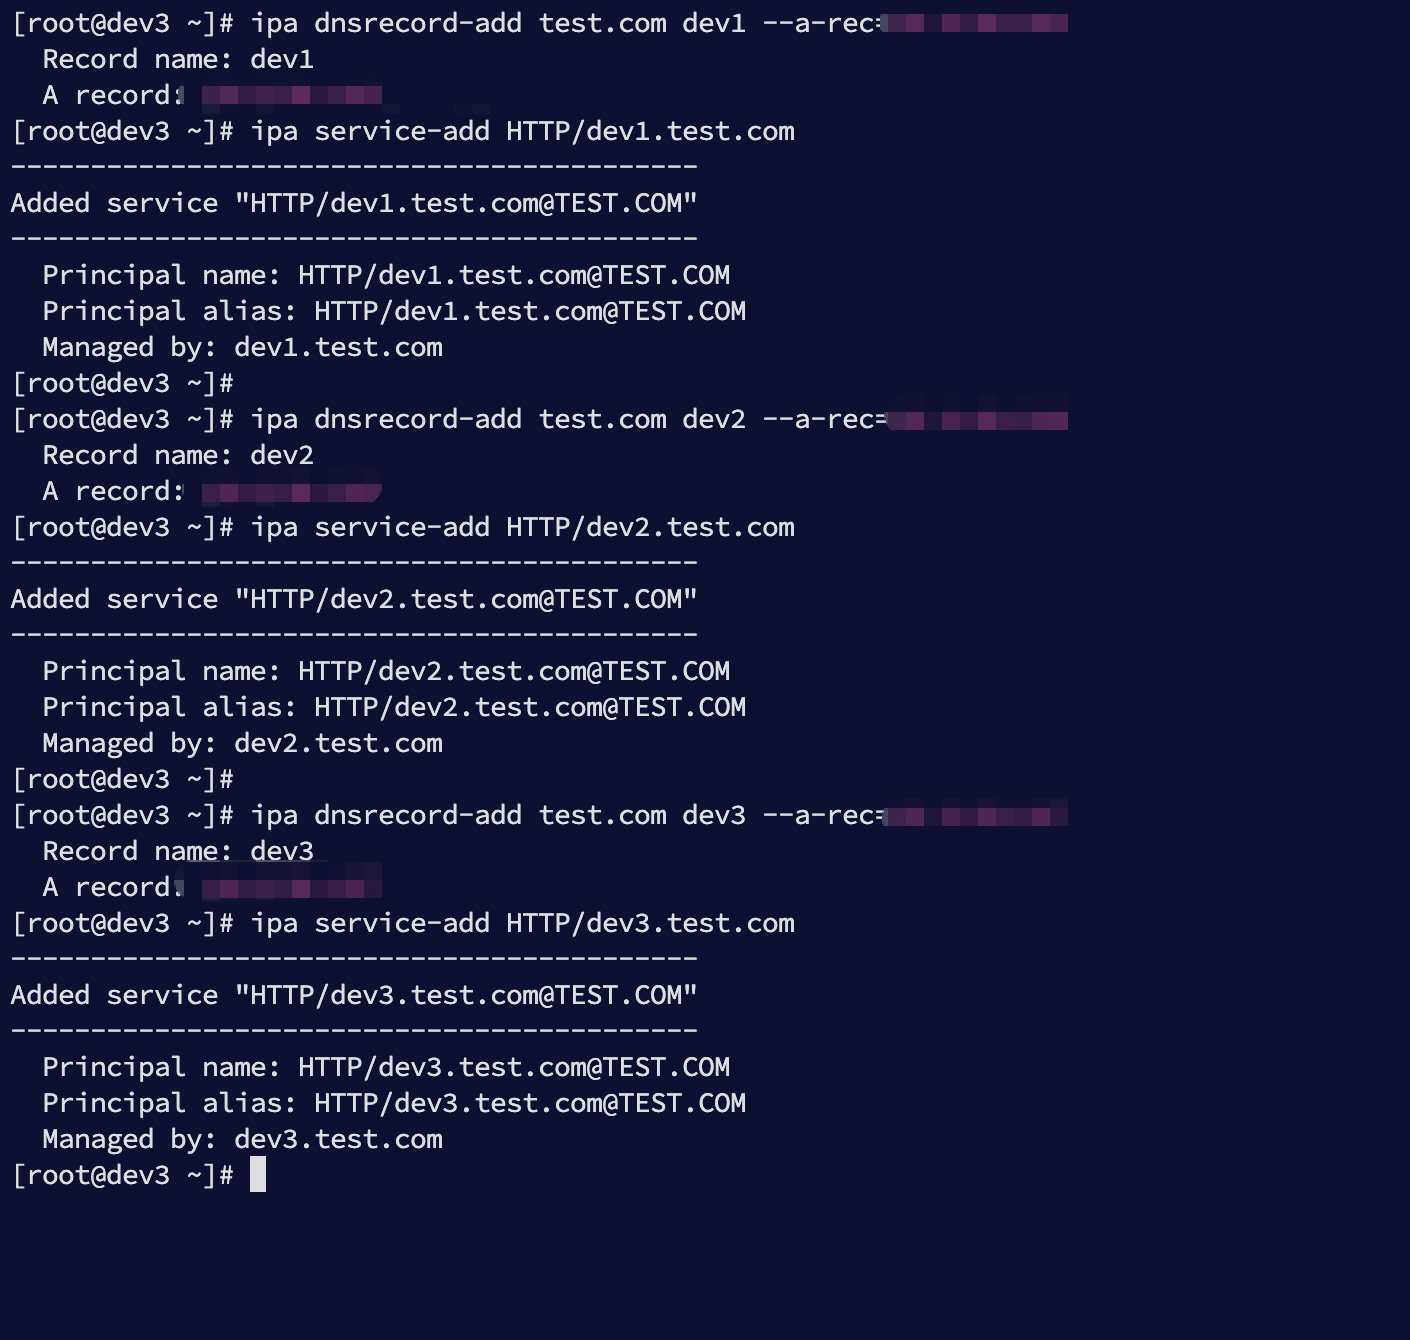
# 4.2 补齐 DNS 与 HTTP Service
当前客户端:
- dev1.test.com → 192.168.3.235
- dev2.test.com → 192.168.3.236
- dev3.test.com → 192.168.3.237
执行:
ipa dnsrecord-add test.com dev1 --a-rec=192.168.3.235
ipa service-add HTTP/dev1.test.com

ipa dnsrecord-add test.com dev2 --a-rec=192.168.3.236
ipa service-add HTTP/dev2.test.com

ipa dnsrecord-add test.com dev3 --a-rec=192.168.3.237
ipa service-add HTTP/dev3.test.com
1
2
3
4
5
6
7
8
2
3
4
5
6
7
8
执行效果:
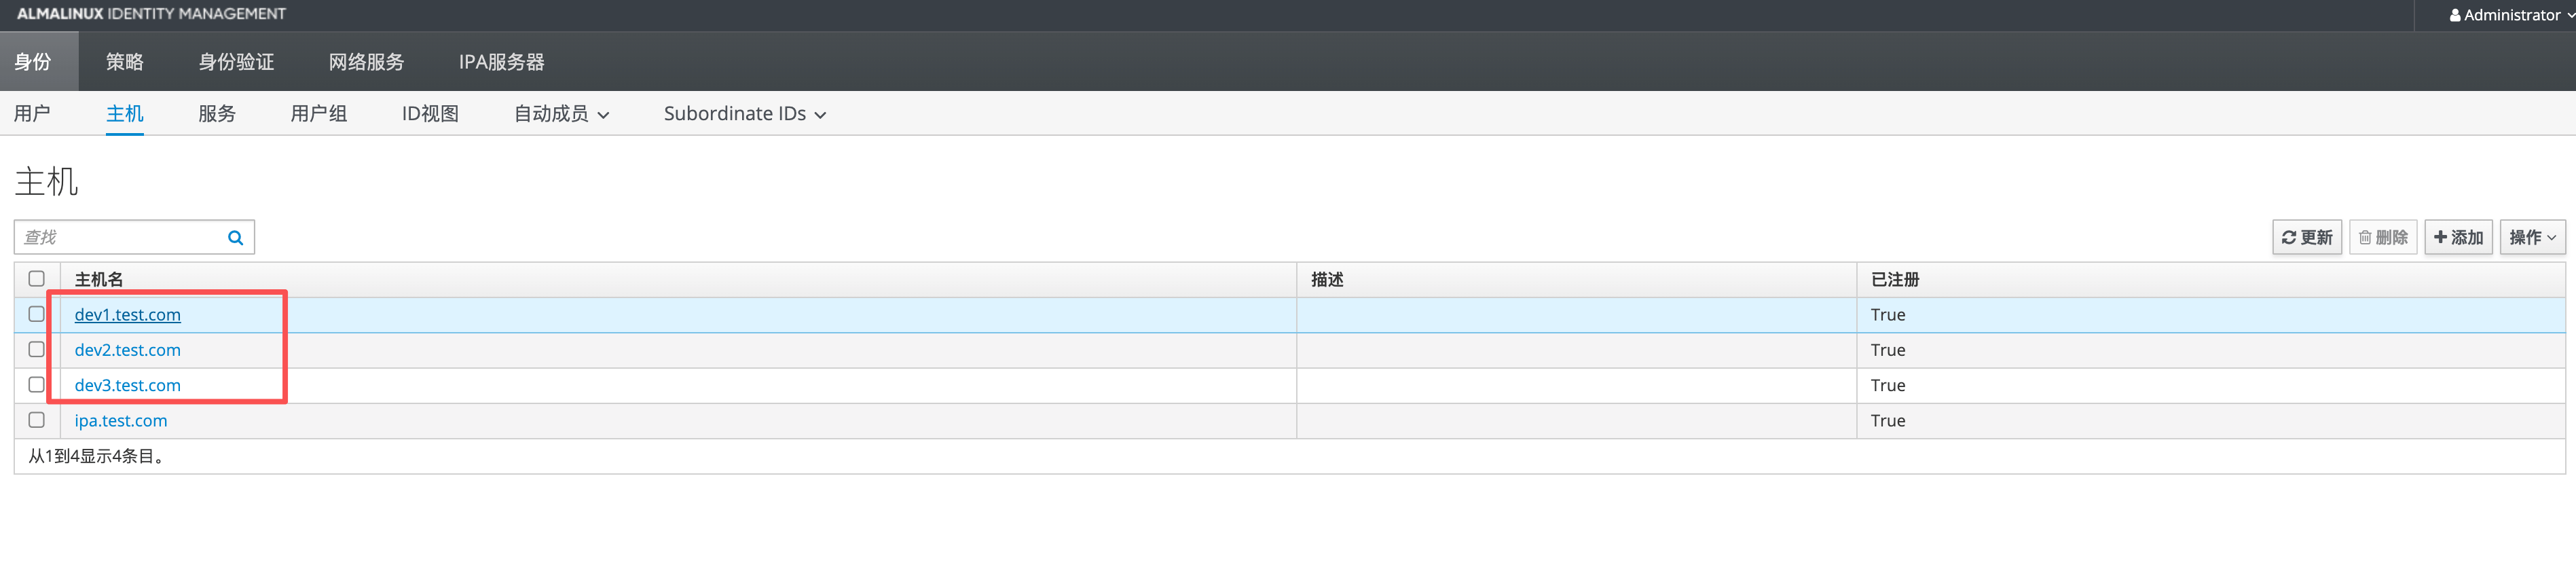
# 五、验证客户端入域成功
# 5.1 Web 控制台验证
如下图可见三台主机:
# 5.2 命令行验证
ipa host-find
kinit admin
id admin
getent passwd admin
1
2
3
4
2
3
4