 Step4—Chrony 时间同步
# Step4—Chrony 时间同步
大数据集群对时间非常敏感。日志排查、数据库事务、服务检查、Kerberos、调度任务都会受到时间漂移影响。这里我推荐用 Chrony,并采用一主多从的方式:核心节点对公网 NTP,工作节点只同步核心节点。
示例架构:
| 节点 | 角色 | 同步对象 |
|---|---|---|
hadoop1.test.com | Chrony 服务端 | 公网 NTP,必要时使用本地时钟 |
hadoop2.test.com | Chrony 客户端 | hadoop1.test.com |
hadoop3.test.com | Chrony 客户端 | hadoop1.test.com |
# 安装 Chrony
三台机器都安装 Chrony。
sudo dnf -y install chrony || sudo yum -y install chrony
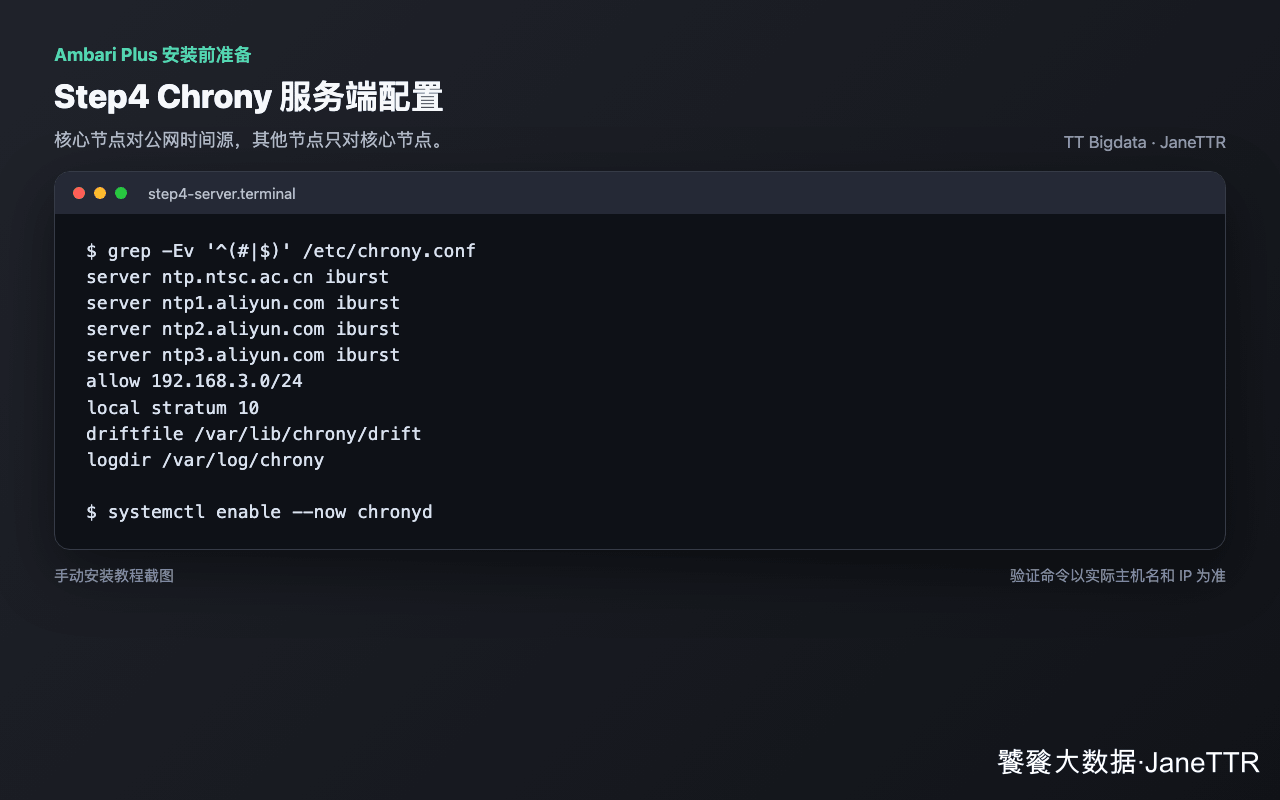
sudo systemctl enable --now chronyd
1
2
2
sudo apt update
sudo apt install -y chrony
sudo systemctl enable --now chrony
1
2
3
2
3
// Make sure to add code blocks to your code group
# 配置核心节点
在 hadoop1.test.com 上编辑配置文件。
sudo cp /etc/chrony.conf /etc/chrony.conf.bak.$(date +%F-%H%M%S)

sudo tee /etc/chrony.conf >/dev/null <<'EOF'
server ntp.ntsc.ac.cn iburst
server ntp1.aliyun.com iburst
server ntp2.aliyun.com iburst
server ntp3.aliyun.com iburst

allow 192.168.3.0/24
local stratum 10

makestep 1.0 3
rtcsync
driftfile /var/lib/chrony/drift
logdir /var/log/chrony
EOF

sudo systemctl restart chronyd
1
2
3
4
5
6
7
8
9
10
11
12
13
14
15
16
17
18
2
3
4
5
6
7
8
9
10
11
12
13
14
15
16
17
18
sudo cp /etc/chrony/chrony.conf /etc/chrony/chrony.conf.bak.$(date +%F-%H%M%S)

sudo tee /etc/chrony/chrony.conf >/dev/null <<'EOF'
server ntp.ntsc.ac.cn iburst
server ntp1.aliyun.com iburst
server ntp2.aliyun.com iburst
server ntp3.aliyun.com iburst

allow 192.168.3.0/24
local stratum 10

makestep 1.0 3
rtcsync
driftfile /var/lib/chrony/chrony.drift
logdir /var/log/chrony
EOF

sudo systemctl restart chrony
1
2
3
4
5
6
7
8
9
10
11
12
13
14
15
16
17
18
2
3
4
5
6
7
8
9
10
11
12
13
14
15
16
17
18
// Make sure to add code blocks to your code group
allow 192.168.3.0/24 按你的真实网段调整。如果是多网段集群,可以写多条 allow。
# 配置工作节点
在 hadoop2.test.com、hadoop3.test.com 上配置,只保留核心节点作为上游。
sudo cp /etc/chrony.conf /etc/chrony.conf.bak.$(date +%F-%H%M%S)

sudo tee /etc/chrony.conf >/dev/null <<'EOF'
server hadoop1.test.com iburst

makestep 1.0 3
rtcsync
driftfile /var/lib/chrony/drift
logdir /var/log/chrony
EOF

sudo systemctl restart chronyd
1
2
3
4
5
6
7
8
9
10
11
12
2
3
4
5
6
7
8
9
10
11
12
sudo cp /etc/chrony/chrony.conf /etc/chrony/chrony.conf.bak.$(date +%F-%H%M%S)

sudo tee /etc/chrony/chrony.conf >/dev/null <<'EOF'
server hadoop1.test.com iburst

makestep 1.0 3
rtcsync
driftfile /var/lib/chrony/chrony.drift
logdir /var/log/chrony
EOF

sudo systemctl restart chrony
1
2
3
4
5
6
7
8
9
10
11
12
2
3
4
5
6
7
8
9
10
11
12
// Make sure to add code blocks to your code group
# 放通 UDP 123
如果核心节点启用了防火墙,需要放通 NTP 端口。
sudo firewall-cmd --add-service=ntp --permanent
sudo firewall-cmd --reload
1
2
2
sudo ufw allow 123/udp
sudo ufw reload
1
2
2
// Make sure to add code blocks to your code group
没有启用防火墙可以跳过,但云主机还要检查安全组。
# 验证同步状态
核心节点查看公网同步:
chronyc tracking
chronyc sources -v
1
2
2
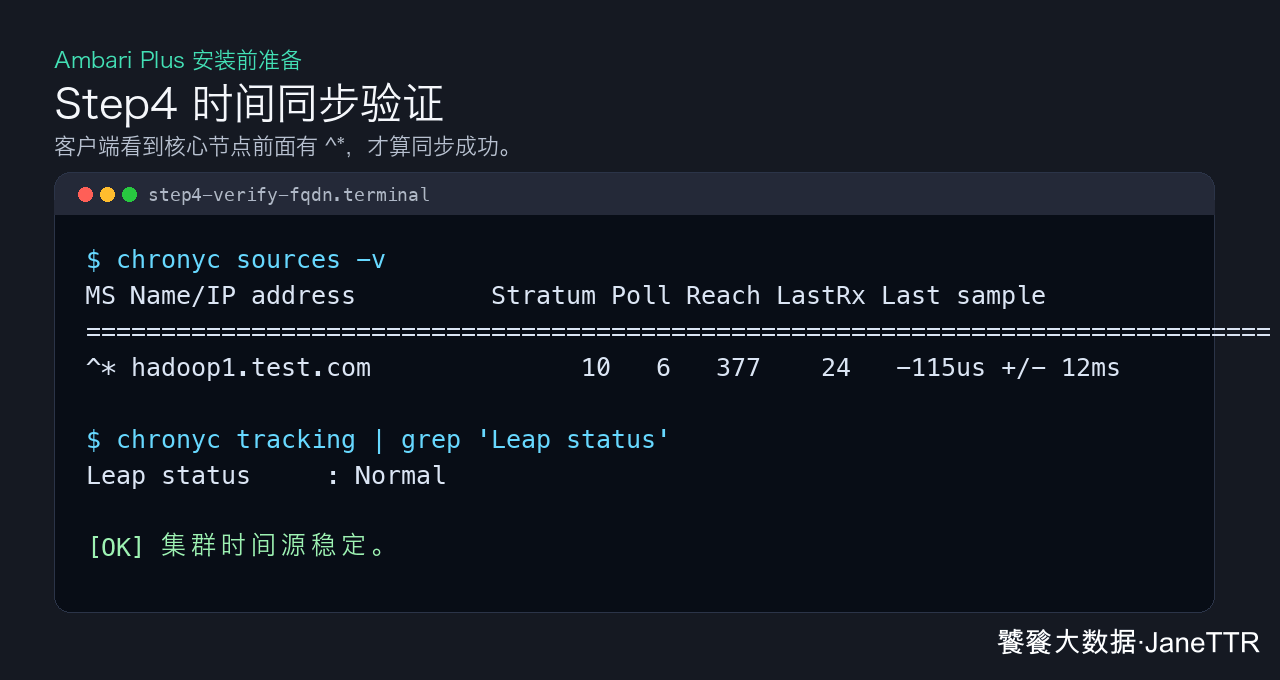
工作节点查看是否同步 hadoop1.test.com:
chronyc sources -v
1
如果输出里看到 ^* hadoop1.test.com 或 ^* 192.168.3.101,说明当前选中的时间源就是核心节点。
# 检查节点时间差
可以从核心节点快速看三台机器时间:
for host in hadoop1.test.com hadoop2.test.com hadoop3.test.com; do
  echo "===== $host ====="
  ssh $host date
done
1
2
3
4
2
3
4
这条命令只能做粗略观察。真正判断 Chrony 是否稳定,我会继续看每台机器的偏移量和闰秒状态:
chronyc tracking | egrep 'System time|Last offset|Leap status'
1
Leap status 显示 Normal,System time 和 Last offset 保持在很小范围内,就可以进入下一步。如果偏移量还在明显变化,先等几轮同步,不要急着初始化数据库和 Ambari Server。
# 常见问题
| 现象 | 原因 | 处理 |
|---|---|---|
客户端看不到 hadoop1.test.com | 主机名解析失败 | 先回到 Step3 检查 /etc/hosts |
Reach 一直是 0 | UDP 123 不通 | 检查防火墙和安全组 |
| 核心节点公网 NTP 不通 | 外网限制 | 保留 local stratum 10,至少保证集群内相对一致 |
| Ubuntu 重启失败 | 服务名写成 chronyd | Ubuntu 服务名是 chrony |
| RHEL 配置不生效 | 配置写到了 Ubuntu 路径 | RHEL 常用 /etc/chrony.conf |
Chrony 通过后,后面数据库、Ambari Server 和组件服务的日志时间会保持一致。